Most dog owners think they know how to put on a dog harness but most don't do it right. Without the proper fit, a dog could get loose, become injured, experience chaffing or choking. A dog harness that's too tight could restrict a pet's range of motion, making it impossible to walk comfortably.
Table of Contents
Using a Dog Harness Properly
Dog harnesses are much safer than traditional collars, and they are more comfortable for dogs, too. A harness is also a great tool for leash training a dog. They come in different styles with features for training, security, better control, car travel and more.
No matter which type of dog harness you buy, it needs to be fitted properly on your dog. Knowing which harness is best for your dog, and then how to put a harness on your dog are the first two crucial steps if you're just starting with this product.
As you'll see in my video, there are two common types of traditional walking harnesses for dogs. You can also buy a no-pull harness that's slightly safer for dogs that pull on leashes. They're all very similar but have enough differences to present complications for dog owners trying to correctly measure them, put them on and then walk dogs with them.
Harnesses are effective because they put pressure on a certain area of a dog's body, like the snout, chest or hind legs. While they are indeed safer than collars, if you don't fit a dog harness properly, your dog could suffer a severe injury, especially a strong puller.
For the purpose of this guide, I focused on two most common types of harnesses: over-the-head dog harness and step-into dog harness. They are both used for walking dogs on a leash, and they perform the exact same function but the way you put them on a dog differs.
How to Put on a Dog Harness
1. Step-Into Dog Harness
In my video above, you'll see my dog Saddie model the step-into harness and I'm walking you through the process of how to put a harness on a dog of this kind. Saddie wasn't being very cooperative in the heat, but at least you can see how to do it. Just in case the instructions weren't very clear, here's what you must know about this.
How to put on a step-in dog harness:
Check the harness. The first thing you'll need to do is check to see if your dog's harness is marked for right and left side. Some aren't, but if yours is then you'll need to make sure each leg gets in the proper hole.
Prepare it. When learning how to put on a dog harness, the easiest thing to do is just lie the harness flat on the ground like you see in the below photo.
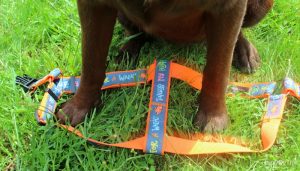
Work with your dog. Walk your pooch over to the harness and place each paw in the holes so the dog is standing directly over the harness like in the above photo.
Put it on. Once there, pull it up and around the dog's chest, and buckle it over your pet's back or on the side (depending on the type of dog harness that you have).
And you're done! This is the simplest, quickest and easiest way to put a harness on a dog if you're using a step-over type. However, many dog owners find it difficult to make their pets cooperate during this process, which is why an over-the-head harness may be easier.
2. Over-the-head Dog Harness
Over-the-head harnesses are much simpler. This is the type that I personally prefer, as it is easier for me and my dog, and during my extensive dog harness review I found that majority of other pet owners prefer this one as well, unsurprisingly.
In the above video, you'll see my second model dog Molly help me demonstrate how to put on a harness of this type. You'll notice that I myself was also having less issues with Molly than with Saddie simply because these harnesses are much easier to work with, and most dogs will cooperate better.
How to put on an over-the-head dog harness:
Check and unbuckle. After you check the harness like before, you'll then need to unbuckle it. If you can't figure out which hole your dog's head is supposed to go through, just look at the instructions that came with this dog harness. While most of them are very similar in concept, some manufacturers do add some of their own ideas into the design so the process of how to put on a dog harness using your own might differ very slightly.
Prepare the D-ring. Some of the pet harnesses can be a bit tricky, but what you need to keep in mind here is that in the end, the D-ring should be positioned on your dog's back and/or chest (again, depending on the specific type of over-the-head harness you're using, which you'll know by checking the guidelines of the item).

Put it on. Now, like you see in the above photo, all you have to do is slide the harness over your dog's head and buckle it on his side. As long as your pooch isn't running away, this couldn't be more simpler.
That's it! As you can see, this is much easier than having your dog step over a harness, so if you're worried about not knowing how to put on a harness on a dog, or your pooch simply won't cooperate, I would recommend starting with an over-the-head harness.
Note: If you need more demonstrations on how to put a dog harness on a dog, you can also check some of my dog harness reviews and their videos. You'll see me dealing with different pet harnesses, putting them on and off, and I provide some tips, too.
- Embark Adventure Dog Harness Review
- EzyDog Chest Plate Dog Harness Review
- Dex Dog EZ Harness Review
- Sleepypod Clickit Utility Dog Car Harness Review
- Your Perfect Puppy Harness Review
3. Proper Dog Harness Fit
Making sure that you get the proper fit is crucial, so you'll need to measure your dog.
If the dog harness is too loose, your pet could slip out of it. If it's too tight, the dog could experience chaffing or the harness could cut into his skin. A pet harness that is too tight could also restrict your dog's range of motion, making it painful for him to walk.
Depending on the type and style of harness that you purchase, there may be 2, 4, 6 or even more adjusting points. These adjusting points work with a sliding buckle, just like traditional dog collars. Simply slide the material through the buckle and pull tight.
As you see in my video above, you'll need to adjust all of these points; not just one or two. At every adjustment point you'll need to make sure that the strap is tight. Always check the manufacturer's guidelines in case they have specific recommendations for this.
When it comes to harness adjustment, you'll want it just tight enough so that you can slip two fingers in between the dog harness and your pet's body easily. This is the same rule typically applied when fitting a dog collar, and this is crucial for a proper and safe fit.
Once all the adjustment points have been individually tightened, check the fit of the entire harness. Try to slide it around. It should NOT slide back and forth across your dog's body or chest. Gently pull the harness towards your dog's head – it should not slide up over the dog's shoulders either.
Once you've put on a harness and done your check-ups, then you're done. The next time will be much easier and simpler after you know all the steps, and your pup is going to be more cooperative, too.
Learning how to put on a dog harness is a bit of a process at first, but the good news is that you should only have to do it once. You'll want to double check the fit every time you secure the harness on your pet, but you shouldn't have to make adjustments unless your dog grows or gains/loses weight.
READ NEXT: Dog Harnesses – The Ultimate Dog Owner’s Buying Guide


