Doing CPR (Cardiopulmonary Resuscitation) is something we’ve all seen performed many times in movies and TV, but it's actually harder than it looks. When you have to perform this life saving task on a dog, it can be overwhelming. Yet, every pet owner must know how to do CPR on a dog just in case you'll ever need it.
Table of Contents
Why You Should Know This
Going through a CPR course is a part of driving courses in many countries, and it's one of the key skills in many professions. All veterinarians and other pet care specialists are prepared to give CPR to a dog. However, as with EMTs, this can often be too late.
Once a dog stops breathing, the oxygen levels in their bloodstream will fall rapidly. From there comes a quick fail of vital organs, including the dog's brain, kidneys, and liver. It doesn’t take more than 3-4 minutes after a respiratory failure to experience irreversible brain damage.
Doing CPR on a dog is more complicated than it is with humans. The dog’s muzzle is different than our mouths, and their bodies are smaller and more fragile than ours. Moreover, guidelines for cardiopulmonary resuscitation for dogs are always changing. For example, AVMA released the most current CPR guidelines in 2012. It's good for pet owners to learn how to do a CPR on a dog, and remember at least the basics.
Listed below are the main basic steps of preparing for and performing CPR on a dog. But even with proper execution of the procedure, there's no guarantee of success. There are many conditions and cases where neither you, nor a professional can help a dog. CPR alone may not be enough to save a dog; rather, it's a time-saving measure until professional help arrives.
RELATED: The Ultimate Guide of First Aid for Dogs
The Guide on CPR for Dogs
Before you learn how to do CPR on a dog, you must understand what CPR actually is. We all know that it involves pushing the victim’s chest and blowing air into their mouth, but these are actually two different and separate things.
What Is Canine CPR?
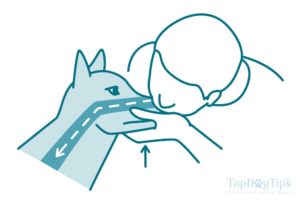 (1) The first is artificial respiration (see above), or blowing air into a dog’s lungs. This is done in case of respiratory arrest, or when your dog has stopped breathing.
While respiratory arrest usually occurs before cardiac arrest (the heart stops working), sometimes cardiac arrest may not even occur.
In such cases, you don’t need to do full CPR, but only focus on the artificial respiration. Doing chest compression in addition to that (meaning, doing full dog CPR) is both unnecessary and dangerous.
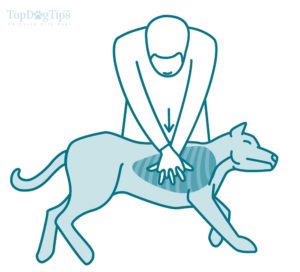 (2) The second part of canine CPR is the aforementioned chest compressions (see above) in case of a cardiac arrest. Cardiac arrest in dogs is almost always preceded by respiratory arrest, but you should still make sure that this has occurred beforehand.
Getting Started with Canine CPR
As you learn how to do CPR on a dog, there are several things you need to do before you start. Keep in mind that CPR is in itself a potentially dangerous procedure, particularly when it is done incorrectly and when it is done unnecessarily.
1. Make the call first
The very first thing you need to do before you start CPR on a dog is to call your vet or an emergency animal hospital. Yes, it will likely take them a long time to get to you. Yes, you will likely have to do immediate CPR to your dog, but the sooner you call for help, the sooner it will arrive.
There are a lot of things a trained professional can counsel you about over the phone, too. If you have a friend or a bystander nearby, you should ask them to talk on the phone so that you can proceed with the next steps as soon as possible.
If you have a car and a friend with you (or a willing bystander), you can also get the dog in the car and perform CPR there, while the second person drives to the nearest veterinarian. As Dr. Daniel J. Fletcher, the co-creator of the Dog CPR Guidelines in 2012 in the Journal of Veterinary Emergency and Critical Care explains to dog owners:
“…[oftentimes CPR] is just a bridge to keep blood flowing and keep some oxygen going to the tissues while you're transporting that animal to a veterinarian for care.”
2. Is the dog breathing?
Now that this is taken care of, your next step in learning how to do CPR on a dog should be to determine whether or not the dog is breathing. The fact that he collapsed doesn’t mean that it's a respiratory arrest. If the dog is not in respiratory arrest, CPR or artificial respiration can be very dangerous, especially on a smaller dog.
To find out whether or not your dog is breathing, put your hand on its chest or simply watch it closely. Dogs take between 20 and 30 breaths per minute, which means that you should see or feel movement at least once every 2 or 3 seconds. If your dog has too much muscle mass, fat and/or hair on its chest or if it’s too big, it may be difficult for you to determine whether it’s breathing this way.
Alternatively, you can also place your cheek or ear close to the dog’s nose to feel for air flow. If you are uncertain this way as well, try putting a piece of glass (a mirror or a phone screen) in front of the dog’s nose – if there’s breath, it should be visible on the flat surface.
If all these checks yield no result, then your dog isn't breathing and you'll have to do artificial respiration.
Should You Perform CPR on a Dog?
Knowing how to do CPR on a dog is one thing, but determining whether you should only do artificial respiration or full CPR with chest compressions is another. You'll need to check for a dog's pulse. With humans, we’re used to checking for pulse at the neck or at the base of the hand.
These are not good places to check for a dog’s pulse, however.
You should either try and feel the heart itself – lay the dog on its back and lift its front left paw (see the graphic below). Then swing its left elbow back to where it meets the chest wall – this is where the heart is. Look there for slight movements of the chest as the heart beats. If you don’t see anything place two fingers at the place and press softly. You should feel the heartbeat if it’s there.
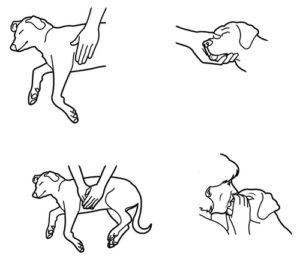 If you’re having troubles locating the heart and a heartbeat, you can check for a pulse is the cylindrical femoral artery. It is located under the insides of the back legs – at the inside of their base. If you don’t feel a pulse there or at the chest, then your dog is also in cardiac arrest and needs full CPR.
Now that you know for a fact that your dog needs full CPR, it is time to prepare it for the procedure. Put it on its back and put its head back as well – as if it was looking up and not down, towards its legs. This is done to open the dog’s airways. If the head is lowered towards the chest, the airways in the throat will be relatively closed and breathing will be much harder.
Always check the airways are clean.
Once the dog is in the correct position, you should make sure that its mouth and airways are not only open, but also clear of obstructions. An obstruction at the back of the dog’s throat can mess with the artificial respiration, so it needs to be dealt with beforehand.
Open the dog’s mouth and look for anything – vomit, blood, mucus, food or any foreign materials. This is a very important step when learning how to do CPR on a dog. If you see anything, remove it. After that, pull the tongue forward so that it doesn’t interfere with the airflow either. Once all obstructions are cleared, return the head to its initial, tilted back position.
How to Do CPR On a Dog
Now the dog is ready for CPR. Remember, if the dog has a heartbeat, only do artificial respiration and skip the chest compressions mentioned below. Also, we will talk about smaller dogs (under 30 pounds/14 kilograms) and bigger dogs (over 30 pounds/14 kilograms) separately, since the size of the dog’s body, chest and lungs are quite important for CPR.
With smaller dogs you run the risk of blowing too much air into their lungs and collapsing them, or crushing their chests too hard and causing damage. With bigger dogs, on the other hand, you risk not pressing their chest or blowing air strong enough out of fear and not doing an effective CPR.

It is not a bad idea to practice light chest compressions on your dog when he’s healthy and you're learning how to do CPR on a dog – not as hard as you’ll need to if the time comes (you don’t want to cause damage or pain to a healthy dog), but to simply get a feel for the dog’s chest’s strength.
CPR on a Small Dog (Under 30lbs/14kg)
Once the dog is on its back, hold it stable with one hand on either side. With your other hand, compress the chest above the heart region. It’s best done with the base of your palm, with your thumb on the one side of the chest and your fingers on the other.
Compress the chest for one inch of depth and for one third or one quarter of the width of the dog’s chest. Count to one and then let go. Carry on compressing at a rate of 80 to 100 times per minute. If you are doing CPR alone, then you will need to do artificial respiration (breathe into the dog’s nose) once for every five compressions.
If you have a second person helping you when you are learning how to do CPR on a dog, then they should do the artificial respiration once per every two or three compressions. Breathing into the dog’s nose is done by first holding the dog’s mouth firmly closed – you don’t want any air to escape from the nose through the mouth. For a small dog, it is easy to place your mouth over the nose and the snout of the dog.
The breath into the dog’s nose should be strong enough to fill its lungs and lift its chest. Once you see the chest lifting you should stop breathing or you risk damaging the lungs.
If there is no cardiac arrest and there’s no need of chest compressions, you can focus on artificial respiration only and aim for 20 to 30 breaths per minute.
Continue the process of artificial respiration and chest compressions until the dog starts breathing and its heart starts working again. Both processes should resume at the same time.
If after 10 minutes of properly done CPR, the dog is still not breathing and is showing no other signs of improvement and/or you are still too far from a veterinary clinic or an emergency veterinary team is too far away, then the procedure hasn’t been effective and you can stop. If you are close to reaching help or help is close to getting to you, continue doing CPR until a professional is on site.
CPR on a Medium/Large Dog (Over 30lbs/14kg)
When learning how to how to do CPR on a dog, you first need to turn the dog from its back to its right side – the heart’s side of the dog’s body should be facing up. Position yourself on the side of the dog’s back. Put one of your hands on the dog’s ribcage, where the heart is. Put your other hand over the first one, parallel to it.
Press the rib cage with both hands. Don’t bend your elbows. Compress the chest for one third to one fourth of the width of the chest. Count to one and then let go. Carry on with the compressions at a rate of 80 times per minute.
If you are doing CPR alone, then you will need to do artificial respiration (breathe into the dog’s nose) once for every five compressions. If you have a second person helping you, then they should do the artificial respiration once per every two compressions. Breathing into the dog’s nose is done by first holding the dog’s mouth firmly closed – you don’t want any air to escape from the nose through the mouth.
For a larger dog, you should close the muzzle with your hand – hold the lower jaw with your fingers, and the upper one with your thumb and the base of your hand. Use both hands in necessary – no air should escape through the mouth.
The breath into the dog’s nose should be strong enough to fill its lungs and lift its chest. If the dog’s chest is not moving, then you need to breathe harder. Once the chest starts lifting, stop breathing or you will damage the lungs.
If there is no cardiac arrest and there’s no need of chest compressions, you can focus on artificial respiration only and aim for 20 to 30 breaths per minute. Continue the process of artificial respiration and chest compressions until the dog starts breathing and its heart starts working again. Both processes should resume at the same time.
If after 10 minutes of properly done CPR, the dog is still not breathing and is showing no other signs of improvement and/or you are still too far from a veterinary clinic or an emergency veterinary team is too far away, then the procedure hasn’t been effective and you can stop. If you are close to reaching help or help is close to getting to you, continue doing CPR until a professional is on site.
READ NEXT: 15 Cheap Ways To Prevent Most Common Health Issues In Dogs


