Table of Contents
Capturing the perfect photograph of your unsettling dog can be next to impossible with the tail wagging, constant movement, and continuous distractions. I've been photographing my own dogs and those of strangers for a few years now, and today I endeavor to improve your dog photography skills with this extensive dog photography guide for beginners.
Before You Delve into Dog Photography
Before you delve into dog photography, let's establish the reason why you want to take photos of dogs and whether it's something you want to pursue as a real hobby or maybe even a career choice.
The three most common reasons people may delve actively into dog photography are:
- To capture specific moments with their dog(s) in time
- To create a popular doggy Instagram page and gain followers
- To help organizations (or friends) with promoting dog adoption
- To earn some money by doing professional-looking dog portrait photography
- To establish their pet as social media superstars (and earn money that way)
Every one of these reasons will have its own set path, so let's briefly cover them.
1. Capturing Moments in Time
Just your good old regular photographs. You want these photos with your dog(s) or of your dog(s) to reflect life at the moment rather than appear to be posed for and staged. For example, a photo of your Fido napping in their favorite spot or a game of Frisbee at the park.
It may look something like this:
 When capturing this type of photograph, you are focusing more on the tools you have on hand – the environment, available light, and current action – rather than setting up the perfect studio-type lighting, adjusting the poses of your dog subject, or arranging props.
This is a photograph that should invoke memories, and the best way to capture this in a single still photo is to shoot a series of photographs while making yourself blend into the background so that you don’t influence your pet subject.
2. Dog Rescue Work
Although some animal rescue organizations will request staged portrait photos to add appeal to their adoptable dogs, rescue work photos are usually a midway point between a candid photograph and a portrait photograph.
It's likely to look like this (@strayfromtheheart):
Your focus for this type of dog photography should be capturing your subjects in their best light while also capturing their personality. Adopters want to see their potential new friend's features, but they also want to know that the dog in question is capable of “being a dog.” Where candid photography shows the “now,” this type of photograph should be a combination of the “now” and potential for the future.
It’s important to achieve a balance between posing and candid dog photos when doing rescue work photography. If you find this difficult to begin with, try holding a candid and a posed photo sitting and choosing a few photos from each. With some practice, you will be able to shoot candid and posed photos in a single shoot.
3. Dog Portrait Work (or Pro Dog Photography)
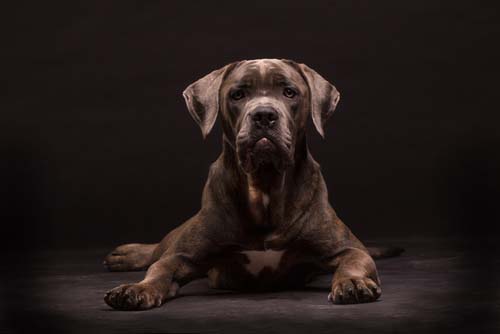
Dog portrait photography is more about capturing the subject rather than capturing an event, a specific moment in time, or projecting potential.
Portraits of dogs are posed pictures that should be shot with optimal lighting and look professional. They can be shot using props and should always make use of a background that does not outshine your subject.
Here's what this may look like (@clickpets):
Many times, portrait dog photography is done in a photography studio where all aspects of the photo can be tightly controlled and manipulated. That said, portraits don’t have to be set in a sterile studio atmosphere so long as they prioritize and capture the personality of the subject.
Pet portrait photography is perhaps the most difficult type of photography when it comes to dogs because it requires your subject to remain still and posed. It also requires the most retouching, most tools, a very controlled environment, and good photography skills. This is what professional dog photographers usually do and how they earn a living.
Working with Your Dog
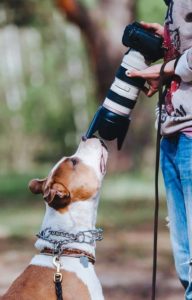 An added difficulty level with dog photography is that you cannot communicate to pets what you want out of them for a perfect photo the way you would to people. Thus, you'll first need to practice your skills of working with a dog and polish on dog training before you'll be able to focus specifically on getting better at dog photography itself.
The first thing to keep in mind when delving into dog photography and taking photos of pets is that unless there is something “in it” for your dog, you’re going to have a hard time getting any quality photos. Fortunately, most dogs are food-driven, which means that you can use dog treats to persuade your portrait subjects to sit and wait quite easily.
While you can bribe your dog to sit for treats, don’t expect them to sit for long. Dogs have much shorter attention spans than humans, which means that you’d better have everything ready to go before you put that dog in a posed position.
That short attention span also means that you can’t expect your dog to sit for a pose after a pose, even if there are treats involved. Dogs don’t like to hold poses, and you need to take this into consideration when setting up your photo shoot, meaning you'll have to work fast.
Preparation and planning is also key. Try to build in breaks between shoots, some playtime with the dog, time for a few minutes of fresh air, time to give your pet some belly rubs to keep them calm – anything that provides a break in the monotony and allows your dog to be active.
Even with the right dog training treats in hand and proper break times built into your dog photography shoot, your pooch is going to tire of “performing” for you. In some instances, they may tire before you’ve even begun!
If you notice signs that your dog is simply not interested in posing or having their photo taken, put away your camera and try again another day when your pet is more engaged and compliant. Forcing photos when your dog is simply not “in the mood” will result in poor photos and wasted time.
Your Basic Dog Photography Equipment (Cheap)
While you can take great quality photos of your dog with a phone camera and even make them look professional, no phone can match the results you can achieve even with a cheap and simple digital camera setup. If you know that you'd like to try dog photography as a hobby and don't mind a little investment, here's the very bare-bones dog photography equipment setup you'll need and can find for relatively cheap.
For the very basic and affordable setup, you'll only need a few items:
- Camera
- Lens(es)
- Lighting setup
With this setup, some creativity, and photography skills, you can take incredible photos of your dog that you'd be proud to share on Instagram or even sell.
The Digital Camera
While you may begin with dog photography basics by shooting photos with your smartphone and applying filters as any real Instagramer would, the true photographer must invest in at least a medium-quality digital camera. Smartphone cameras offer great resolution, but they are limited in the photography-related features that they offer. More importantly, you can't pair the phone with some photography equipment you'll need for great-quality photographs of pets.
When choosing a digital camera (DSLR) for pet photography, take a few things into consideration.
Get a Camera That Suits Your Experience Level
If you are truly a newcomer to dog photography (or photography in general), you don’t want to get in over your head and select a camera that is designed for expert photographers because it may end up a waste of money, and it will be more difficult to learn. Choose a digital camera that is amenable to “beginners” and work up from there.
- Snap Bridge Bluetooth...
- 24.2mp dx format CMOS sensor
- Expeed 4 image processor
- No optical low pass filter....
- Native ISO 100 25600; 5 fps...
The most recommended cheap DSLR camera for beginners right now is the Nikon D3400 because it's very user-friendly and easy to use and learn. This camera incorporates professional must-haves without all of the “extra” features that you don't need in the beginning while you're learning about how to frame, how to light, how to position a dog, and other basic aspects of photography itself (and not the equipment).
Different Uses of Your Camera
Think about what types of photographs you will be taking most often – this will influence which type of camera will work best for you and your dog's photography style.
For example, are you constantly on the go and looking to capture candid photographs (the run-and-gun type of dog photography)? If so, consider a more compact camera option like the Sony Cyber-shot RX100 V (or a more expensive compact alternative with fancier features like the Sony Cyber-shot RX10 IV).
- FASTER AUTOFOCUS: Shoot up to...
- PROFESSIONAL LENS: Our...
- HIGH RESOLUTION 4K: The RX100V...
- 20.1 MEGAPIXEL PHOTOGRAPHY:...
- CAMERA GRIP: The RX100V...
If you decide to go with dog portrait photography in a controlled environment and are looking for a DSLR camera better suited to studio photography and higher quality photographs, you won't go wrong with the above-mentioned budget camera like the Nikon D3400 or Canon EOS Rebel T7i. Both of these are the most affordable in that category and best rated in terms of value for the price.
- Canon EOS Rebel T7i Digital...
- The T7i DSLR offers advanced...
- Canon EF-S 18-55mm f/4-5.6 IS...
- [Kit Includes:] Canon Rebel...
- Lens Cap Keeper, XIT 58mm 2.2x...
Need a more affordable alternative to the DSLR camera that offers professional quality? Try a bridge camera like the older version of Sony Cyber-shot RX100 or its close cheaper competitor, Panasonic Lumix ZS50 – both of them are similar, but just remember that you’re not going to get the same caliber of camera for your buck as you would with the DSLR. It's great for capturing your dog in the moment.
- Approximately 20.1 megapixels...
- Operating temperature:Approx....
- Burst Mode (shots)-Approx10...
- Bright F18 Carl Zeiss...
- Dimension: 1016 mm x 581 mm x...
For something a little different, such as shooting photos of your dog in the water instead of dry land, which is popular right now, consider a waterproof camera like the Olympus TG-5, but remember that this is a specialty camera and will not provide optimal quality dog photography in all situations and is mostly to be used for its waterproof feature.
- New 12 megapixel Hi speed...
- Underwater compensation: 2 EV...
- Dual quad core TruePic VIII...
- Field sensor system with GPS,...
- Waterproof to 50 feet, F, dust...
If you are looking to expand on your repertoire and include some video capabilities, try filming your dog instead of just taking photographs. The cheapest and best price-for-value camera you can get is a DSLM (a mirrorless camera). The most recommended budget DSLM with a 4K video recording function is the Panasonic Lumix G7 (the absolute winner in the category for this price) or a more expensive Panasonic Lumix GH5 camera.
- Bundle Includes: Panasonic...
- 20.3MP Digital Live MOS...
- Venus Engine Processor: The...
- Rugged Design: The diecast,...
- Connectivity: It has a...
Camera Lenses
There is an endless range of lenses that can be attached to your digital camera to enhance dog photography. As with cameras, the lenses you should invest in depends on the type of photography you will be focusing on, but in some ways, they are more important and valuable than the camera itself.
There are two classes of camera lenses you'll need to know about to start with – a prime lens and a zoom lens. I'll explain this briefly without getting too nerdy on the subject.
Prime Lens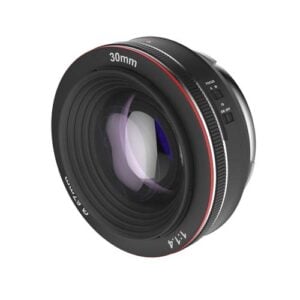
A prime lens incorporates more brightness into your photograph rather than focusing on zooming in as close as possible on a subject. This may or may not be a cheaper lens option with a fixed focal length that excels at capturing sharp photos with wide angles and fast-moving subjects and is great for use under low-light situations.
There are five types of prime lens you need to know:
- The standard lens captures images exactly as you see them through the human eye.
- The wide-angle lens takes a broader photograph and is best for landscape or large group photos.
- The fish-eye lens combines a spherical perspective with a panoramic effect. While popular in real estate photography, this isn’t commonly used in pet photography.
- The telephoto lens maintains the same view of an image but brings it closer.
- The super telephoto lens works the same way as a telephoto lens but works best for much longer distances.
Zoom Lens
A zoom lens is best for shooting photographs from a distance when you prefer to zoom in rather than physically get closer to the subject. Rather than shooting quickly, this type of lens focuses on the stabilization of the image. Again, depending on the camera and the lens itself, it may be a more expensive lens. The zoom lens has a variable focal length and is ideal for still-life photography, but it doesn't have some of the pros of the Prime lens.
There are two types of zoom lens you should know:
- The digital zoom lens crops the image you see to a smaller size and resizes that cropped version to fit the frame, making the subject seem closer.
- The optical zoom lens increases magnification by changing the focal length, making the subject seem closer.
Lighting
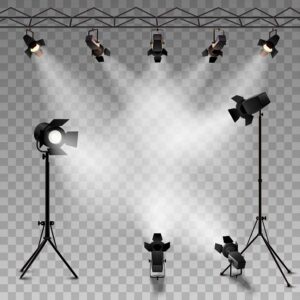
Lighting is something beginning photographers rarely consider. Only after taking a few hundred shots do they see that something isn't right with those photographs, and it's usually the proper lighting. There are plenty of things to consider when it comes to dog photography lighting, including the direction of light, the type of light, the temperature of light being used, and the lighting equipment you'll use. This is particularly important when photographing dogs. I'm not going to delve deep into the equipment because even a cheap and basic lighting setup like this can be enough for a beginner.
Light Direction/Position
Front Lighting is lighting placed directly in front of your dog, highlighting detail by casting shadows behind the pet. This type of lighting is easy for the beginner to use, but it can create a two-dimensional photograph.
Side lighting helps to add depth to a photo and will make your dog stand out more in the picture, but it requires more knowledge of light itself, the technique, and how to use shadows creatively and to your advantage.
Backlighting is the most difficult type of lighting to master because, when done incorrectly, it will create nothing more than a silhouette of a dog (unless that's what you want). Done correctly, though backlighting can create a unique dimension and make your doggy photo stand out and look incredibly unique, this requires more knowledge of your camera to manually override exposure settings and good skills in positioning the light source.
The Type of Light
Hard light creates more depth to a photograph of your dog by creating a darker contrast in shadows, whereas soft light creates a smoother transition between dark and light. Where hard light is more dramatic and can be great for close-up or wider shots, soft light is a better choice for full doggy portraits, for example, since it does not create deep shadows on the features.
Hard and soft lighting can be changed by altering the distance of light, using a lower wattage bulb, offsetting your light temperature (see the following section), or by using filters or other accessories to disperse or focus your lighting.
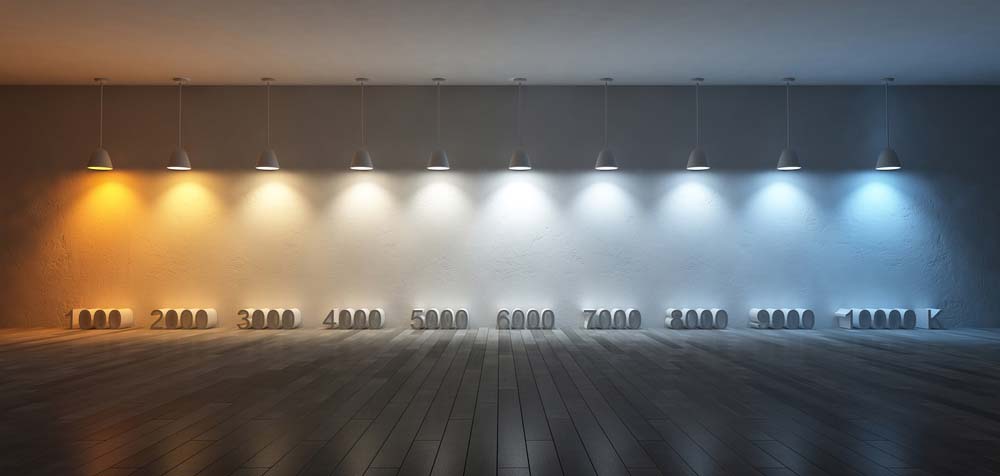
Light Temperature
Light bulb color, light filters, and the time of day can all influence the color of light when you are shooting a photograph, but so too can your camera settings.
Your camera has a “white balance” function that automatically adjusts color contrast to make white appear white, but manually overriding this function on your camera will allow you to create cooler or warmer lighting effects. Adjusting your balance to a bluer shade, for example, will create a cooler photograph, and adjusting it to a more orange shade will create a warmer appearance.
Miscellaneous Items
When taking photographs of your dog, you will need a few things on hand in addition to your camera and lighting equipment, namely, dog treats! Keep plenty of treats, toys, and other engaging stimuli on hand to hold your dog’s attention while taking their photograph. Giving your dog treats and toy breaks will be key to successful photoshoots.
You will also want to have props handy if you are staging a scene in a studio environment, and you browse some examples of good dog photography, you'll see that it's common. Props can range from something as simple as a dog basket to a bowtie and a top hat. It adds some context to the picture.
The Dog Photography Basics
Now you've got the camera, a lens or two, and some lighting equipment. You know that you'll be shooting either indoors in a controlled environment or outdoors with some run-and-gun moments. Here are some dog photography basics to keep in mind that are related specifically to what every photographer (pets or other subjects) knows. I recommend searching these terms online for some more information, as knowing how to control this will allow for much better dog photos.
ISO
ISO refers to how sensitive your camera is to light. The lower the ISO, the less sensitive your image sensor is to light, and the grain of your photo will be finer. Higher ISO is better in low light situations, but too high and your photo may become too “noisy”.
- Read this guide on ISO.
Aperture
Aperture measures how much light is let in through the diaphragm of your camera lens. The higher the number, the smaller the aperture opening and the less light is permitted through the camera lens. A higher aperture creates more depth to an image, but it also means that the shutter of your camera has to stay open for longer because less light is coming in through the lens.
A large aperture or smaller number setting is a good way to focus on a single subject like your dog, whereas a small aperture or larger number setting is better for a photo focusing on scenery that relies on more depth (but can still be used effectively in dog photography).
- Read this guide on aperture.
Shutter Speed
Shutter speed refers to the length of time that the camera shutter stays open to allow light in through the camera sensor. This influences how bright your photo is and can create a freeze or blurring of action shots, such as your dog catching Frisbee.
A long shutter speed allows more light to make a brighter photo, but it also creates a motion blur if your pooch is moving fast. A great example of the use of long shutter speed is a photo of a dog jumping to catch a Frisbee in the air, where the jumping dog is blurred to show movement.
A fast shutter speed allows less light to make a darker photo but allows you to capture fast-moving objects without a motion blur. A great example of the use of short shutter speed would be capturing a photo of water droplets on a dog’s mouth after they finish drinking.
Exposure
This is how bright your photograph is. Exposure is a direct result of your shutter speed but is also influenced by the aperture and ISO settings of your camera.
- Read this guide on exposure.
The Dog Photography Composition
Equipment and terminology of its use are all fine and good, but for your dog photography sessions to result in amazing photos you're proud to share on Instagram or even start selling to people as a service, you'll need to have a trained “photographer's eye,” which means having an understanding of composition, framing and what makes the photo actually look attractive and/or interesting to a human's eye.
I recommend reading the book “A Photographer's Eye” for more tips on this (personally, this book is responsible for making my dog photography skills significantly better). But if you're not up for a read, here are the very basics you should consider for good dog photos:
The Rule of Thirds
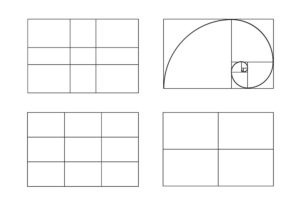
The “Rule of Thirds” is a concept in photography and painting that helps to balance the composition of an image. To do this, imagine a grid of nine squares over the image you are photographing. Now, balance the image by placing points of interest within these squares so that they are balanced vertically and horizontally.
For example, a photo of your dog at the beach may focus on the horizon in the top third of the image, the ocean in the middle third, and the sand in the bottom third. You may then want to line up your dog in the middle square of the bottom third to balance the composition.
You don’t always have to abide by the “Rule of Thirds,” but it’s a great way to get started if you’re having trouble with composition, and this is what will set you up for becoming more successful with dog photography in general.
Perspective
Perspective makes a dog photograph more interesting to the eye. You can alter perspective by changing the vantage point or angle, altering your viewpoint, getting closer or further from the dog, or shooting through another item when taking photos of your pooch.
Background Composition
The background composition of your pet photographs has a significant impact on the final image. For example, when taking a photograph where you want to focus on your dog, you don’t want to have a background that is concentrated and just too busy to take attention away from your Fido. Instead, you want the background of your image to be blurred or simple so that the eye is drawn to your dog as the primary subject.
Framing Your Dog
Framing is a technique used to draw the eye to the subject of a photograph, and in this case, your pooch. The best example of this would be to take a photograph of your dog in their doghouse using the door of the house to frame your dog’s image. The shape of the doghouse doorway draws your eye to the image of your dog. Conversely, if your dog was simply laying in your front yard, there would be no “frame” around the image, and your eye would be attracted to various points of the photograph.
Close-Ups Vs. Zoom
Using close-ups and zoom are both techniques that can influence the composition and appearance of your photo, but which should you use when? In this dog photography guide, we talked about Prime and Zoom lenses, and this is one of the many cases where it matters which lens you use.
A zoom lens works to make a subject appear closer than it is. For example, if your dog is playing at the dog park five feet from you, you can bring that picture closer using a zoom lens (instead of physically coming closer to the dog).
Close-ups or “macro” settings are used to create an extreme focus on images without bringing them closer to you. For example, if your dog is sitting beside you and you want a photo that captures the print of the dog's nose, a macro setting would be better for the job than using a zoom lens.
Cropping
Cropping is another method of optimizing the composition of your doggy photograph. Cropping can be done by using the camera lens to crop and focus on only part of your Fido, or you can crop a full image after shooting the dog using photo editing software.
When cropping your images, you need to make sure that your picture composition is balanced and that your dog is well-framed. For example, when taking a photo of your Fido eating a treat, you may want to crop the image to focus on his head and shoulders. What you don’t want to do is crop the image to awkwardly cut off your dog’s ears, the bottom of their jaw, or the sides of their face to create an abnormally shaped head.
Although cropping is a technique that you can focus on through practice, it is also something that your eye will naturally recognize. Whether it's dog photography or any other type, when a photograph is cropped incorrectly, you will almost always be able to tell just by looking at it. It stands out.
Making Your Job Easier
There is plenty to consider when taking on dog photography, so anything that you can do to make your job easier is worth the effort. If you are struggling with your dog’s photoshoot, give one of these tricks a try:
Tire your dog out. Take your dog for a walk before the photo shoot to get out some of that extra energy. Just be sure not to make it too long, or your pup won’t be able to stay awake.
Experiment with new things. If the dog treats you are using aren’t doing the trick, try something new that your dog hasn’t tried before – the stinkier, the better. This may also result in a much more interesting photo.
There's always tomorrow. If things just don’t seem to be going the right way or if you find yourself getting frustrated, try again another time. When you're just getting into dog photography, take it slow because there will be times of frustration.
Don’t rush. Commit to about half a day or at least a timeslot that is long enough to accommodate a photo session that is double the length of your expectation. This is more for your dog to keep him focused rather than yourself.
Don’t Let the Work Ruin the Fun
Finally, remember to keep your dog photography venture as something fun you can do as a way to relax and enjoy yourself. I've had days where I just couldn't handle anymore the fact that my dog subjects do not listen the same way a human would.
Working with dogs and taking their pictures can be frustrating, and I will be the first to confirm this from first-hand experience, but it’s important not to let the work aspect of dog photography ruin the fun; otherwise, you'll never pick that camera up again.
Remember, you are trying to capture priceless moments, not experiences of frustration. Your dog photography results should bring smiles to people's faces. So limit your pet photo sessions to short periods to capture the good stuff, and remember, your dog is a dog; they’re not the next top model, and you can’t expect them to pose like one.
READ NEXT: 6 Pet Photography Tips – How to Take Great Photos of Your Dog
Disclosure: We may earn affiliate commissions at no cost to you from the links on this page. This did not affect our assessment of products. Read more here and find full disclosure here.
Want to share this?


