Table of Contents
When the winter weather sets in, it's time to start thinking about winterizing our homes.
Our pets' dog houses are no exception.
I looked around and got some amazing advice from various DIYers on the best DIY cold-weather dog house and how to keep our dogs warm in winter.
Although no dog should be left outside for extended periods of time in freezing weather, sometimes your pooch must spend more time outdoors than expected.
When that happens, you'll want to make sure that your dog has a safe, warm place to hang out until it's time to come back inside.
Top Dog Tips editor-in-chief Samantha has previously written about cold weather preparations for your dog.
It was a great article, but I thought that we all could use some advice for dogs who live in our backyards and need a DIY cold-weather dog house in there.
DIY Winter Dog House: How to Keep Your Dog Warm in Winter
Why your canine needs an insulated dog house for winter
You may think that since dogs are animals with fur, they'll do just fine in their regular dog houses during winter without any trouble.
Unfortunately, that's not the case.
Our loyal companions need assistance from us with insulating their homes and making those dog houses winter-proof.
So, why do dogs need cold-weather dog houses?
Because just like us, dogs are at risk of frost bites, hypothermia, or simply getting cold.
Surprisingly, even dog breeds that should deal well with cold weather, such as Huskies, are often looking for a warmer place to rest during cold winter months.
Hypothermia.
Your canine can develop hypothermia when his body temperature goes down to unusually low levels, which is common during freezing days in winter.
Hypothermia is a dangerous condition that can affect your dog's nervous system negatively.
The rate of your dog's heart and the blood flow speed will lower as well, putting your dog at further health risks. This is why veterinarians also warn pet owners to provide dog winter clothes for regular walks in cold weather.
Frostbite.
While hypothermia in dogs is dangerous, frostbite for dogs can become an even bigger problem.
This is mostly because many pet owners are very late to recognize frostbite in dogs due to their long coats, and they often realize this when it's nearly too late.
Many things can go wrong in the dog's body when they develop frostbite, and the best way to avoid this is to take precautions, such as insulating your dog's house.
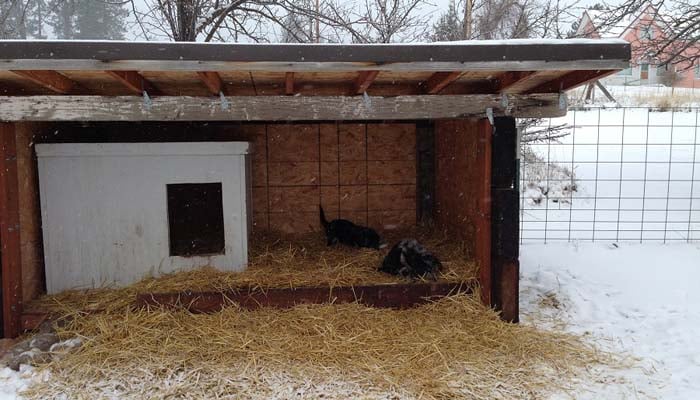
Here's an awesome example of an insulated DIY cold-weather dog house that was modified and not built from scratch.
Check out the video where the puppies are having a lot of fun in winter.
Winter puppies at getyourpitchforkon.wordpress.com
DIY winter dog house planning phase
There are several options when it comes to providing a great DIY cold-weather dog house that will serve as an ideal winter home for your pet.
Such an undertaking isn't for everybody, but it also doesn't have to be as scary as it sounds once you have all the necessary information from other, more experienced DIYers.
We all understand that most people choose to purchase pre-made dog houses, available at most pet stores, feed stores, and online.
However, if you're handy with tools or just feeling adventurous this winter, you may wish to try out some Do It Yourself solutions.
What are your options?
Your dog may already have an outdoor shelter that you'll want to modify to better withstand the frosty elements.
Alternatively, you could construct an entire DIY cold-weather dog house from scratch, keeping an eye on designs that include insulation and other features for the cold weather season.
Both options are fine and doable, and the below DIY tips will help you either way.
Where to start?
Begin with planning your DIY project well. One of the first things to consider before taking on this sort of mini-dog-house-building project is how you want to position your future DIY cold-weather dog house in your yard.
Here are some things that you need to take into account:
- Avoid low-lying areas that may flood when it rains or when the snow melts. You don't want your dog to have to splash through puddles and get wet paws in the cold. Plus, the added moisture inside the DIY cold-weather dog house could make any bedding uncomfortable, smelly, or moldy.
- If your dog is a jumper and loves escaping from your backyard, pick a spot that's not too close to your fence. The house could provide just enough height boost to allow your dog to leap the fence from its rooftop.
- Position the dog house's opening so it faces the door to your own home. This way, you can keep an eye on each other from your respective shelters. Your dog will feel more comfortable knowing they haven't been abandoned, and you'll be able to check on your dog with a quick glance.
- Does your yard get bombarded with strong crosswinds in the winter? If you can determine the direction the strongest winds come from, plan to put the dog house's door facing the other way. This will help ensure that your dog won't get blasted with arctic winds when trying to get cozy.
DIY modifying an existing dog house to make it winter-proof
If you plan to modify an existing dog house, several resources are available that walk you through the process.
A few of them are mentioned below, following a quick rundown of materials you may need to collect before you start dismantling things.
Insulation.
Most online instruction videos and plans call for rigid foam insulation, like this one.
You will likely be able to find this at your local hardware store.
Fiberglass batting, like this one, is another option, although not as popular.
Whichever you decide to use, be sure that the insulation won't be installed somewhere your dog will be able to get to it.
So, if you use a design that calls for insulation in the dog house's floor, make sure it's entirely concealed by plywood or other barriers.
Hardware.
When your DIY dog house plans call for staples, screws, or nails to hold things together, galvanized aluminum or stainless steel is your best bet.
Galvanized metals have been treated with a coating that makes them resistant to corrosion.
See here for more details about these materials if you have questions.
And this is how to tell if the nails you may already have in your toolbox are galvanized.
You'll also want to make sure any nails or screws are the proper lengths.
Sharp points that poke through to the inside of the dog house are a safety hazard.
Bedding.
The floor of your dog's new home will need to provide insulation against the cold, especially if your building plans don't include rigid foam or batting underneath.
Luckily, there is a wide range of options for the dog house's bedding.
The bedding depends on how much cleaning up you're prepared to do in your new DIY cold-weather dog house.
Materials most DIYers use are usually old quilts, cedar chips, or straw bedding, all of which must be changed regularly.
Of course, you can always spend a little extra on a proper dog bed, but you need to be okay with what will happen to the bed eventually.
Heating.
As bedding options vary, so do the heating methods for your DIY cold-weather dog house, as it says in this article.
Not every dog house will need a heating element, but if you want to add one, there are a few cautions to observe.
It's important to remember that wires should be concealed so your dog can't chew or get tangled in them.
Any heading pads on the ground should have an automatic shut-off or be on a timer.
More information about heating can be found on AVMA's site.
The best option seems to be a product that uses your dog's body heat, called a self-warming dog bed such as this one.
Designs for your DIY cold weather dog house modifications
Now that you know some of the materials you might need to get started with your DIY cold-weather dog house, it's time to pick a design that works specifically for your case.
Below are a few resources step by step guides on winterizing existing dog houses, or if you are looking for inspiration.
- Stephanie Mitchell's article on SFGate suggests a pallet or cement blocks put some space between the floor of the dog house and the ground. Her instructions call for rigid foam insulation and a heavy vinyl flap to cover the door.
- Phyllis Benson's contribution to the Daily Puppy is a house mod that involves a vapor barrier under the house, roof insulation, and carpeted walls. If you have a slow internet connection, be aware that this site has a few popup ads that could slow you down.
- This article on DoItYourself.com gives excellent advice focused on the walls of the dog house. The author mentions using rolled insulation, as it cuts easily with a pair of scissors. They also suggest sealing up any gaps with caulk.
All the advice given about modifying a dog house to prepare it for winter is very similar.
As I mentioned above, a few significant factors constitute a dog house to become winter-proof: proper insulation, essential bedding, and a heat source.
These are the only parts you need to focus on if you're trying to modify your dog house.
To check all the boxes of those three significant factors, here's what you need to do in a nutshell to make sure your dog's house is ready for winter:
- Install Styrofoam sheets
- Install a dog house heater
- Provide warm dog bedding
Surprisingly, it's relatively easy to modify a DIY cold-weather dog house and ensure warmth for your pup.
So, let's look at these three “to do” checkboxes and how to do them easily and quickly.
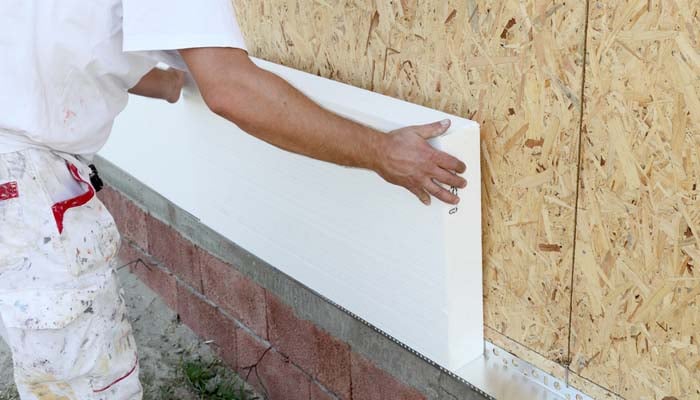
How to install Styrofoam sheets in your winter dog house
Fortunately, it's easy to learn how to place Styrofoam sheets of polystyrene insulation into a DIY cold-weather dog house.
The Styrofoam sheets of polystyrene will trap your dog's heat and keep it inside the dog house even on very cold days.
Here are the steps you need to take to install Styrofoam sheets in your wooden dog house of the square shape:
- Remove the front wall from the dog house so you can take measurements.
- Mark all the dimensions into the panels of the Styrofoam insulation material.
- Simply cut out those foam panels based on the dimensions.
- Take a staple gun and staple those foam panels onto the outside of the dog house.
- Check that the staples didn't go through inside the dog house for safety.
- Do the same for the front of the house, and cut a hole for the entrance.
- Remember to smooth all panels with sandpaper to avoid rough edges.
- Now, cut out panels of 1/4-inch size plywood to cover the foam panels on the house.
- Make sure plywood panels are at least 3 inches wider to cover the foam fully.
- Finally, staple the plywood panels on top, and you're done.
These are the basics of modifying an existing wooden dog house to make it into a DIY cold-weather dog house.
After doing this, remember to check for any staples anywhere, rough edges, and other things your dog can potentially hurt himself on.
You can also paint the house or add another wall inside the home for aesthetics, but that's not necessary.
If you like specifics, you can follow this guide for an alternative method or additional details.
And here's a video explaining the concepts of this DIY build.
How to build a dog heater for the dog house for cheap
Pet parents who don't mind spending the extra cash to make sure their dogs are warm during winter can purchase a dog heater for the dog house.
These things are popular and safe, and you don't need to get yourself into trouble installing them.
However, they cost money, with the cheapest being around $100.
Dog owners who feel like saving that extra $100 and want to put their DIY skills to the test will enjoy this short guide on how to build your own dog heater for the house using a simple paint can.
Bear in mind there are other options for dog house heater builds out there, so look for them if you wish; I chose this one as the most appropriate option.
So, how do you build a heater for a dog house out of a paint can?
You will need quite a few things to build your own heater, as well as the tools to make it.
I would say this is more for a somewhat experienced DIYer because the electricity is involved, and some skills can come in handy.
Materials that you will need:
- Old can of paint that's been washed clean
- Working extension cord
- 100-watt flood light
- Some kind of lamp base
- Wire clamp
- Corner brackets
- Different types of nuts and screws
Tools that you will need for this:
- Drill and drill bits
- Hole saw
- Jigsaw
- Wire strippers
As you can see, you will need to trust your electrical skills to avoid putting your dog at risk.
It's not complicated per se, but you have to be careful, follow the guide, and know what you're doing in terms of electrical safety.
Here are several guides on how to do this:
- DIY 100-watt Dog House Heater from Instructables
- DIY Heating Element to Your Dog House from DoItYourself
- How to Build a DIY Dog House Heater from eHow
Finally, watch the video below for an alternative (kind of) method to ensure you understand exactly how this is done.
You'll see how easy it is to create a heater for your DIY cold-weather dog house, but make sure you follow the instructions.
How to provide cheap dog bedding for the winter dog house
You've already taken two of the most important steps to ensure your DIY cold-weather dog house is ready for the winter months: insulating it with Styrofoam and installing a dog house heater.
This is roughly 80% of the job and will keep your canine relatively warm in winter.
You can also provide your Fido with warm bedding for the extra warmth and those nasty additional cold days in December, January, and February.
Having something to lie down on that's not the cold ground of the dog house will provide that additional level of insulation that finishes up the DIY winter dog house construction at 100%.
Once again, you have two options here.
 You either buy something for your dog (which can be either a warm bed or something electrical with an additional source of heat) or make your own bedding for the dog house. If you buy bedding, you can pick anything from decent dog beds to heated dog mats that start at approximately $40.
If you want to create your own dog house bedding for cheap, many owners will suggest going with straw as your base material.
This is a popular choice; you can buy stray hay in most local farm supply stores.
Remember to keep this from coming in contact with your heater so it doesn't catch on fire.
However, during my research, I found a few possible cons to using hay straw for dog bedding in the house.
- First, this article suggests choosing long-stem grass hay, which is different from the regular stray hay that most pet parents go for. Besides being plant-based, the two hays have almost nothing in common and are two other things. Long-stem grass hay will be better for the dog because it's allegedly healthier and maintains its structure and warmth better.
- Second, another article from PetEducation advises against using either one of those options due to the possibility of infesting your DIY cold-weather dog house with sarcoptic mange, fleas, and ticks. It's difficult to say how much truth there is to that, but you can never be too well-informed. Instead, the article suggests using wood shavings as your dog's house bedding. They will probably be more expensive and harder to clean, but it's a safer option overall.
Feeling super adventurous and confident in your DIY skills?
Then try building a DIY cold-weather dog house from scratch.
Below, I'll provide some excellent online guides by experienced DIYers that will set you on the right path to getting your first winter dog house right.
Building a winter dog house from scratch
If mods aren't what you're into and you want to start from the ground up, the web is awash with free plans, designs, and instructions on creating a DIY cold-weather dog house from scratch.
I selected a few that specifically address the need for winter-ready features.
- Ron Hazelton's Custom Insulated Dog House seems to be the most popular How-To article regarding DIY help. The plans can be downloaded for free. Not only can you view a video along with the written instructions, but there are separate videos for each step in the process. His measurements work off of the size of your own dog for a truly custom fit.
- You can find this DIY video on the Insulated Siding YouTube channel. Its main features are insulated siding (of course) and a hinged roof with tiles. It is built using precut wood panels. This is an excellent video for people with handyman experience, as it gives a quick summary of the process rather than detailed steps.
- Examiner has a detailed article here. It includes step-by-step directions for installing Styrofoam sheeting for insulation and making a heat source from a paint can. There are also videos and instructions for making a complete dog house from start to finish.
Following either of the above DIY guides is best to build your first DIY cold-weather dog house.
Avoid experimenting with your first construction, as you want to avoid putting your pet in danger after you're done with the project.
This is why I chose not to instruct you guys in this article on how to build your own winter dog house but instead link to some credible sources.
Finally, I recommend watching the video below for more tips, advice, and proper guidance on building the dog house for the winter months.
Excellent information overall for anybody looking to get some inspiration and ideas.
Good luck with whichever method you choose!
Taking the time to gather your materials beforehand and do a bit of research will set you up for success.
Before long, your dog will have a cozy hideout to be proud of.
Disclosure: We may earn affiliate commissions at no cost to you from the links on this page. This did not affect our assessment of products. Read more here and find full disclosure here.


